Not feeling my best today but found something ugly on my media cabinet and grabbed some silver from my graffiti cabinet and made something prettier. New paint brush holder. Who knew! Take something weird or old in your house and give it a face lift. Great way to add new pops to your place when you can't afford to go out and buy something to make it pop! Have a dandy weekend kids!
Showing posts with label the dandy fox. Show all posts
Friday, May 10, 2013
Thursday, May 9, 2013
Safari summer
Labels:
aviators,
beaty,
dry shampoo,
Faliero Sarti,
fashion,
hat,
Levi's,
make up,
Mossimo,
polyvore,
Rachel Zoe,
Ray-Ban,
Revlon,
safari,
Souve,
style,
summer,
the dandy fox,
weekly wednesday wants
Wednesday, May 8, 2013
Personalize the impersonal.
Okay so today I'm blogging on how to make my personally favorite present, a gift card...... personal!
A lot of people seem to think that they are impersonal, but since I'm not rolling in cash I can't just shop whenever I'd like. Getting a gift card gives me an experience that I can't often afford myself, I'm a crafter and sale finder. I find a lot of random designer stuff on sale because I just refuse to pay full price for most things. So gift cards are as good as gold to me. While they come on a cardboard thingy and there are actual gift card boxes you can use....making the packaging is alot more special.
This tutorial is actually a gift for my moms Mother's Day present. I hope she doesn't read this before she opens it!
First you are going to need your supplies to get started. Any smaller envelope will do, I actually reused the leftover RSVP envelopes we had from our wedding.
SUPPLY LIST
Envelope
Craft paper
Die cutters
Jute twine or bakers twine
Beads and fish wire (optional for added decor)
Ink pad
* First, you are going to want to select which craft paper to use. I used two different ones to create contrast of the two shapes.
* I took my assorted markers and made little polka dots on the envelope face that matches the colors of the craft paper chosen.
* I then used the die cutters to easy cut the shapes that I wanted for the envelope cover.
* Apply glue generously to larger cutout and place where you'd like on the envelope face. Let dry for a few seconds, then apply the second, smaller cutout if you wish. Let dry.
* Use your gift card to crest a template for craft paper that will match the die cuts on the front. Make sure it's larger than the gift card, but small enough to insert smoothly into your envelope. Now lick n seal it!
* Now that your at the back of the envelope anyways, it's time to make a fingerprint heart! Pick your favorite finger (I picked my thumb because it is the strongest and most useful, just like my mommy). For me, this personalized my crafting the most, after all my fingerprints only exist because of my parents.
* First press your thumb into the ink pad and use some test paper first to see how much control you have of your print transfer. Now do the same on the sealed part of your envelope, once pointing your finger left, then re ink your finger and repeat by slightly over lapping the previous print with this time your finger pointed to the right. Now you have a heart shape with your finger.
* Now cut your choice of wire or twine. I cut mine about a foot and a half in length to give myself room for error. This method works for ribbon wrapping for presents as well.
* Lay your twine vertically and place your envelope face down on top of it with your twine underneath in the middle. Bring each side of your twine across the envelope and when they meet in the middle, change direction and cross the twine over and being to pull horizontally. This will give you that crossed look in the back.
* While holding the twine in place, flip the envelope face up. Tie a knot to secure , not too tight cause you will start to rip and pull the edges of your envelope. Now you can insert any charms or bears that you want to add and tie that fish wire at an area of twine close to the base of your knot.
*Now finish it off my tying a bow. Trim any excess left of twine.
* Your done! Now you have an amazing personalized gift card.
A lot of people seem to think that they are impersonal, but since I'm not rolling in cash I can't just shop whenever I'd like. Getting a gift card gives me an experience that I can't often afford myself, I'm a crafter and sale finder. I find a lot of random designer stuff on sale because I just refuse to pay full price for most things. So gift cards are as good as gold to me. While they come on a cardboard thingy and there are actual gift card boxes you can use....making the packaging is alot more special.
This tutorial is actually a gift for my moms Mother's Day present. I hope she doesn't read this before she opens it!
First you are going to need your supplies to get started. Any smaller envelope will do, I actually reused the leftover RSVP envelopes we had from our wedding.
SUPPLY LIST
Envelope
Craft paper
Die cutters
Jute twine or bakers twine
Beads and fish wire (optional for added decor)
Ink pad
* First, you are going to want to select which craft paper to use. I used two different ones to create contrast of the two shapes.
* I took my assorted markers and made little polka dots on the envelope face that matches the colors of the craft paper chosen.
* I then used the die cutters to easy cut the shapes that I wanted for the envelope cover.
* Apply glue generously to larger cutout and place where you'd like on the envelope face. Let dry for a few seconds, then apply the second, smaller cutout if you wish. Let dry.
* Use your gift card to crest a template for craft paper that will match the die cuts on the front. Make sure it's larger than the gift card, but small enough to insert smoothly into your envelope. Now lick n seal it!
* Now that your at the back of the envelope anyways, it's time to make a fingerprint heart! Pick your favorite finger (I picked my thumb because it is the strongest and most useful, just like my mommy). For me, this personalized my crafting the most, after all my fingerprints only exist because of my parents.
* First press your thumb into the ink pad and use some test paper first to see how much control you have of your print transfer. Now do the same on the sealed part of your envelope, once pointing your finger left, then re ink your finger and repeat by slightly over lapping the previous print with this time your finger pointed to the right. Now you have a heart shape with your finger.
* Now cut your choice of wire or twine. I cut mine about a foot and a half in length to give myself room for error. This method works for ribbon wrapping for presents as well.
* Lay your twine vertically and place your envelope face down on top of it with your twine underneath in the middle. Bring each side of your twine across the envelope and when they meet in the middle, change direction and cross the twine over and being to pull horizontally. This will give you that crossed look in the back.
* While holding the twine in place, flip the envelope face up. Tie a knot to secure , not too tight cause you will start to rip and pull the edges of your envelope. Now you can insert any charms or bears that you want to add and tie that fish wire at an area of twine close to the base of your knot.
*Now finish it off my tying a bow. Trim any excess left of twine.
* Your done! Now you have an amazing personalized gift card.
Monday, May 6, 2013
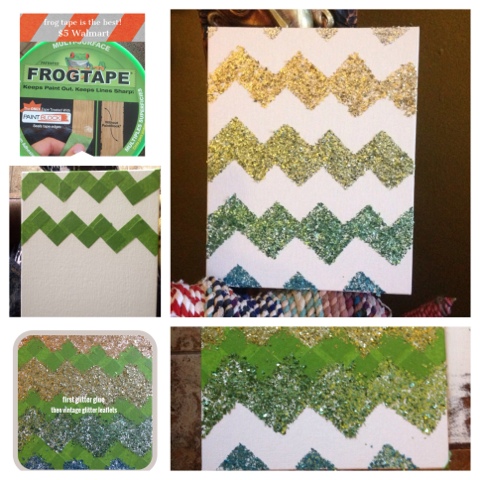
Ombré glitter chevron print on canvas
Happy Monday readers!! It's chilly here in oceanside and I had some downtime (as one does with a bad back often) this weekend to get into the craft box since my hubby worked on his "man space" in the garage.
A lot of the items i used to craft is all repurposed from my wedding so I was really surprised to find that I still had alot of stuff. Even though the wedding was only a year and a half ago.
So if you like this dandy little craft here's the easy how to. ( Side note: This is also how I'm working on repurposing a dresser since I'd rather make my own Chevron print stencil a la Frog tape than pay for a stencil. It's pretty easy on bugger surfaces with a tape measure of ruler. )
Here are the items you'll need
* CANVAS (I have alot of 5x7 & 8x11 from micheals cause they are cheap)
* FROG TAPE (yes the paint block technology is an actual thing that works. I joked till I found its true)
* SCISSORS
* GLITTER GLUE (mod podge, gel medium, acrylic paint works too)
* KESHA, OH I MEAN GLITTER (I have a pack of vintage leaflet glitter from Martha Stewarts line which comes in a ton of great colors and mix well, but you can use whatever you have)
*PAINT BRUSH OR SPONGE BRUSH APPLICATOR (to pack the glitter once applied so you don't end up like Kesha)
*PATIENCE
Remember you can also do this with watercolor or acrylic paint for a more contemporary style.
First you are going to want to mark off your chevron print. I found that 2 inch
strips of frog tape worked well.
Start from left to right and work the next strip of tape overlapping the previous slightly (make sure they are lined up good so you get even lines). Keep each chevron line about an inch apart.
Make sure you go over the tape with your fingers so it is nice and flat and secures well to the canvas. It's okay if you have seams from tape strips overlapping, that won't matter.
Once you have all your frog tape in place, generously apply your form of glue or paint in the open or blank areas. Go section by section so you don't get dried out.
Sprinkle your glitter generously all over the glued areas. I used a brush/sponge to help spread and pack the glitter in there so I had no "naked" spots.
Work your way down section by section until your canvas is completely glittered or painted.
Now be a patient little fox and let this pretty dry. I left for work and came home later so this had around 4 hours to dry. It probably only needs 1 or 2 hours max to dry.
If you used glitter, shake any excess glitter off of your canvas.
Now it's time to peel!!
Start peeling the frog tape from left to right, as this is how you would have applied the frog tape originally. Go slowly, so not to stress the glittered or painted areas. This part is actually kind of fun, you'll see how well frog tape does block out everything!
Once all the tape is removed, give it a little shake and tap the edges to let any more excess fall off.
That's it! Now don't go crazy and chevron your entire house like I have!
A lot of the items i used to craft is all repurposed from my wedding so I was really surprised to find that I still had alot of stuff. Even though the wedding was only a year and a half ago.
So if you like this dandy little craft here's the easy how to. ( Side note: This is also how I'm working on repurposing a dresser since I'd rather make my own Chevron print stencil a la Frog tape than pay for a stencil. It's pretty easy on bugger surfaces with a tape measure of ruler. )
Here are the items you'll need
* CANVAS (I have alot of 5x7 & 8x11 from micheals cause they are cheap)
* FROG TAPE (yes the paint block technology is an actual thing that works. I joked till I found its true)
* SCISSORS
* GLITTER GLUE (mod podge, gel medium, acrylic paint works too)
* KESHA, OH I MEAN GLITTER (I have a pack of vintage leaflet glitter from Martha Stewarts line which comes in a ton of great colors and mix well, but you can use whatever you have)
*PAINT BRUSH OR SPONGE BRUSH APPLICATOR (to pack the glitter once applied so you don't end up like Kesha)
*PATIENCE
Remember you can also do this with watercolor or acrylic paint for a more contemporary style.
First you are going to want to mark off your chevron print. I found that 2 inch
strips of frog tape worked well.
Start from left to right and work the next strip of tape overlapping the previous slightly (make sure they are lined up good so you get even lines). Keep each chevron line about an inch apart.
Make sure you go over the tape with your fingers so it is nice and flat and secures well to the canvas. It's okay if you have seams from tape strips overlapping, that won't matter.
Once you have all your frog tape in place, generously apply your form of glue or paint in the open or blank areas. Go section by section so you don't get dried out.
Sprinkle your glitter generously all over the glued areas. I used a brush/sponge to help spread and pack the glitter in there so I had no "naked" spots.
Work your way down section by section until your canvas is completely glittered or painted.
Now be a patient little fox and let this pretty dry. I left for work and came home later so this had around 4 hours to dry. It probably only needs 1 or 2 hours max to dry.
If you used glitter, shake any excess glitter off of your canvas.
Now it's time to peel!!
Start peeling the frog tape from left to right, as this is how you would have applied the frog tape originally. Go slowly, so not to stress the glittered or painted areas. This part is actually kind of fun, you'll see how well frog tape does block out everything!
Once all the tape is removed, give it a little shake and tap the edges to let any more excess fall off.
That's it! Now don't go crazy and chevron your entire house like I have!
Labels:
acrylic,
Chevron,
crafts,
DIY,
glitter,
Martha Stewart,
mod podge,
ombré,
the dandy fox,
wall decor
Monday, April 29, 2013
Wedding Vendor Advice
So part of what inspired The Dandy Fox, was my wedding. I spent many hours crafting and DIY-ing till my eyes were bloodshot and my fingers cramped. I made backdrops, antiqued shutters, came up with love inspired cocktail recipes, handmade our invitation suites and hand made our bouquets and boutonnières by hand painting sola flowers and making my own paper flowers from my husbands old thrasher and transworld skateboarding magazines. All of this was inspired by my love of crafting and to have things that represented our love that were made by us.
I did it with no coordinator, but I did appoint those who were willing to help.
Things to remember
Budget budget budget
We paid for our own wedding, which is something I'm very proud of. My mother gave us our honeymoon airfare and timeshare as a present which saved us a huge load of money. But if you don't have a budget you are going to overwhelmed, over budget and vendors will take advantage of the wedding craze in your pretty little eyes.
You need to find out what type and style of wedding you'd like to have when you are keeping a budget in mind.
Contemporary
Modern
Vintage
Upscale
Backyard
Beachside
DIY
These things will help you target your vendors as well. There's no sense in having club style dj with a modern contemporary photographer in a ball gown in your wedding is in a beautiful country barn house or on the beach.
Almost anything goes now. While its not ideal to have your colors be navy and burgundy in the middle of June, there are ways to make it work.
Make a list once you know what you are working with. Set aside a specific amount of money you'd like to spend, leaving the most $ for what is the most important to you. And keep in mind and write down what you'd like to be able to get for what you are willing to spend. Mine was the photography and the band. Your photographer or videographer is the only tangible way you will be able to remember your special day. So you might have a beautiful wedding, with a bunch of horrible photos that won't allow anyone to Remember how gorgeous your day was.
After you search your vendors, make a top three list. When you talk to them, let them know how much you can spend on them and what you are hoping to have. Know what you are getting when you get it. Most good and note worthy vendors will have you sign a contract and ask for a non refundable deposit when you sign it. This locks you in or your deposit is lost.
Doing these steps will prevent you from going over your budget but they always say to add a "cushion" to your budget so your not stuck tight and panicking at the end.
More advice. I am a hairstylist and makeup artist. I have not only worked on brides, but whole bridal parties doing hair and makeup as a lone wolf. If you are the only one getting your hair and makeup done its not usually too stressful
Benefits of going into a salon the day of are basically that
It's usually more affordable and
you can usually buy touch up products there before you leave.
Cons:
Someone is always late ( usually its the bridesmaid who has children, or the mother of the bride)
Someone forgets to pay in the chaos, so I've seen brides get footed with paying for one of her bridesmaids.
Someone forgets to make an appointment (a good salon is busy so they have to stress their staff out to accommodate the hair or makeup that was forgotten, if they can even do it)
Usually the photographer can't be there, (the photography of getting ready are among my most treasured photos.
Running late at the salon means running late for your wedding, and that means all the girls with you too.
It's not as personal and private
When you have a hair and makeup artist come to your wedding location, or wherever you are getting ready
You can laugh and be loud amongst yourselves spending time together with your closest friends and family while getting pampered and pretty.
Everyone is usually all there at the same time so there is a much more laid back feel and you can have fun and relax.
Your photographer has one less place to get all their equipment/assistants to so they can capture the process of you getting ready.
If you are getting ready on location, if anything goes awry, you are there to answer anybody's questions.
If your running late, your not cause your already there!
Cons:
it's usually twice the price
That's about it. ;)
Hire a day of coordinator to tell all your vendors where to go or appoint someone with a list you've made to let them know where everyone needs to be at what time.
Always leave more than just your own contact number. You can't control everything it will only stress you out and you'll be to busy getting gorgeous anyways!
Each vendor had not only my husband and mines phone numbers
But each parent and the maid of honor and best man.
Okay breathe, I know that was a massive amount of info.
Oh and treat wedding mags like a luxury. There are a ton of absolutely awe inspiring wedding blogs out there that will give you all the ideas and info you need.....for free.
Our wedding was featured on Rock And Roll Brides Blog and featured in issue 2 of their official magazine. Here's the link to check out my day as a bride!
http://www.rocknrollbride.com/2011/12/a-diy-wedding-with-a-mountaintop-view-larry-chelsea/
Here's a list of a few amazing blogs, many offer a lot of giveaways and free downloads to use from invitations to table numbers and props!
Www.greenweddingshoes.com
Www.rockandrollbride.com
Www.ruffledblog.com
Www.100layercake.com
Www.Stylemepretty.com
Www.diybride.com
I did it with no coordinator, but I did appoint those who were willing to help.
Things to remember
Budget budget budget
We paid for our own wedding, which is something I'm very proud of. My mother gave us our honeymoon airfare and timeshare as a present which saved us a huge load of money. But if you don't have a budget you are going to overwhelmed, over budget and vendors will take advantage of the wedding craze in your pretty little eyes.
You need to find out what type and style of wedding you'd like to have when you are keeping a budget in mind.
Contemporary
Modern
Vintage
Upscale
Backyard
Beachside
DIY
These things will help you target your vendors as well. There's no sense in having club style dj with a modern contemporary photographer in a ball gown in your wedding is in a beautiful country barn house or on the beach.
Almost anything goes now. While its not ideal to have your colors be navy and burgundy in the middle of June, there are ways to make it work.
Make a list once you know what you are working with. Set aside a specific amount of money you'd like to spend, leaving the most $ for what is the most important to you. And keep in mind and write down what you'd like to be able to get for what you are willing to spend. Mine was the photography and the band. Your photographer or videographer is the only tangible way you will be able to remember your special day. So you might have a beautiful wedding, with a bunch of horrible photos that won't allow anyone to Remember how gorgeous your day was.
After you search your vendors, make a top three list. When you talk to them, let them know how much you can spend on them and what you are hoping to have. Know what you are getting when you get it. Most good and note worthy vendors will have you sign a contract and ask for a non refundable deposit when you sign it. This locks you in or your deposit is lost.
Doing these steps will prevent you from going over your budget but they always say to add a "cushion" to your budget so your not stuck tight and panicking at the end.
More advice. I am a hairstylist and makeup artist. I have not only worked on brides, but whole bridal parties doing hair and makeup as a lone wolf. If you are the only one getting your hair and makeup done its not usually too stressful
Benefits of going into a salon the day of are basically that
It's usually more affordable and
you can usually buy touch up products there before you leave.
Cons:
Someone is always late ( usually its the bridesmaid who has children, or the mother of the bride)
Someone forgets to pay in the chaos, so I've seen brides get footed with paying for one of her bridesmaids.
Someone forgets to make an appointment (a good salon is busy so they have to stress their staff out to accommodate the hair or makeup that was forgotten, if they can even do it)
Usually the photographer can't be there, (the photography of getting ready are among my most treasured photos.
Running late at the salon means running late for your wedding, and that means all the girls with you too.
It's not as personal and private
When you have a hair and makeup artist come to your wedding location, or wherever you are getting ready
You can laugh and be loud amongst yourselves spending time together with your closest friends and family while getting pampered and pretty.
Everyone is usually all there at the same time so there is a much more laid back feel and you can have fun and relax.
Your photographer has one less place to get all their equipment/assistants to so they can capture the process of you getting ready.
If you are getting ready on location, if anything goes awry, you are there to answer anybody's questions.
If your running late, your not cause your already there!
Cons:
it's usually twice the price
That's about it. ;)
Hire a day of coordinator to tell all your vendors where to go or appoint someone with a list you've made to let them know where everyone needs to be at what time.
Always leave more than just your own contact number. You can't control everything it will only stress you out and you'll be to busy getting gorgeous anyways!
Each vendor had not only my husband and mines phone numbers
But each parent and the maid of honor and best man.
Okay breathe, I know that was a massive amount of info.
Oh and treat wedding mags like a luxury. There are a ton of absolutely awe inspiring wedding blogs out there that will give you all the ideas and info you need.....for free.
Our wedding was featured on Rock And Roll Brides Blog and featured in issue 2 of their official magazine. Here's the link to check out my day as a bride!
http://www.rocknrollbride.com/2011/12/a-diy-wedding-with-a-mountaintop-view-larry-chelsea/
Here's a list of a few amazing blogs, many offer a lot of giveaways and free downloads to use from invitations to table numbers and props!
Www.greenweddingshoes.com
Www.rockandrollbride.com
Www.ruffledblog.com
Www.100layercake.com
Www.Stylemepretty.com
Www.diybride.com
Saturday, April 27, 2013
Eric & Brenda's Vintage Inspired shoot by Raquel Ames Photography!
Today I have the privilege of featuring Eric and Brenda's vintage inspired engagement session! Photos are brought to us by San Diego and Southern California based lifestyle photographer Raquel Ames.
The couple was shot on an exclusive North San Diego County Mountain countryside location that naturally captures Raquel Ames' amazing talents....and how gorgeous this couple is! They worked together to collaborate on prop and styling ideas and they delivered beautifully. There is no filter more gorgeous than a yawning sun. Excited to share their nuptials as well later this year. If you are interested in a wedding, lifestyle shoot or session quote you can contact Raquel at reaphotography@rocketmail.com for a quote or package pricing to capture your special day and moments! Her website link is also located first on our Link Lovin section. Can't wait to share more of this couples love! Congratulations to Eric and Brenda!
Monday, April 22, 2013
Rehab addiction continues
I call my husband the trash man. No he doesn't really bring home trash. Well sort of, but I'm talking amazing artwork, sea glass, antique telescopes. Anyways he brought home this cheap ikea esque shelf thingy once cause he wanted a place to organize and store some music stuff and I wanted to literally light it on fire. I tried to throw it out a couple of times but it always ended up back in the house.
Now that we have more room and I need some girly storage space I thought it was time to rehab with my trusty cabinet full of rustoleums 2x spray paint. And I had a wine rack that needed help.
I cleaned everything down
Buffed the boo boos out with steel wool# 0000 ( remember this grade also works to distress your furniture after painting or to add shine to furniture that is already finished with a sealant)
I painted the shelves in different colors cause I wanted a pop.
Let dry for an hour and then apply your second coat.
Voila. New and Matches our room color scheme that is slowly coming together!
Now that we have more room and I need some girly storage space I thought it was time to rehab with my trusty cabinet full of rustoleums 2x spray paint. And I had a wine rack that needed help.
I cleaned everything down
Buffed the boo boos out with steel wool# 0000 ( remember this grade also works to distress your furniture after painting or to add shine to furniture that is already finished with a sealant)
I painted the shelves in different colors cause I wanted a pop.
Let dry for an hour and then apply your second coat.
Voila. New and Matches our room color scheme that is slowly coming together!
Saturday, April 20, 2013
The Beauty Balm Boom
So if you are a frequent shopper of beauty places such as ulta, sephora, department store counters, you've probably noticed a lot of lines tend to come out with the same something new all at the same time. First lip plumpers, then primers, then gel liners, then...well you get the point. So this time Beauty Balms. In case you are wondering, this is what most lines are calling their "BB" Creme. It's intended to be the soft merriment of a primer, tinted moisturizer, anti aging Creme and SPF. And I've had the chance to try a couple. Everthing from Garnier to Smashbox has one. And I really wasn't too impressed.
My skin is pretty difficult to impress and as a makeup artist and acne fighter, you can imagine that I have high standards. I'm also going into my late twenties so even though I have an olive complexion, I have just a few hints of wrinkles (2 to be exact) hyper pigmentation, bigger pores and with oily skin I fight acne and blackheads.
There aren't a lot of products out there that can be oil free and moisturizing without causing me to breakout.......so I thought.
Urban Decay has once again blown my mind. Now I know it's on the pricey side (perks of a makeup artist/hairstylist) but its well worth the $34 for this Beauty Balm. They chose wisely to include it as part of their Naked line. I picked it up at Ulta and got a free gift of their 24/7 glide on black liner and their newer makeup setting spray which works pretty well too. So here's the scoop in why I love Urban's BB Creme the most.
*It only has SPF 20 which is actually healthier for you because of what needs to be in SPF to make it stronger is actually toxic to your body. So it does help provide a healthy level of protection.
* Its oil free but hydrates and helps improve proper hydration over time
* It primes so your makeup stays where it belongs and doesn't clog pores.
* It has a general pigment that will fade into any skin tone without dulling your skin so it can minimize pores, lines, wrinkles and redness
* It actually treats your skin to improve elasticity, firming and reducing spots as well!
If you are really dry naturally I would follow with your regular moisturizer. It's Demi-matte so no matte tour skin type it won't be oily. The consistency is also very liquid to Creme. Most primers are very creamy to help minimize pores and wrinkles but that doesn't work well if you are acne prone. Give it a try!
My skin is pretty difficult to impress and as a makeup artist and acne fighter, you can imagine that I have high standards. I'm also going into my late twenties so even though I have an olive complexion, I have just a few hints of wrinkles (2 to be exact) hyper pigmentation, bigger pores and with oily skin I fight acne and blackheads.
There aren't a lot of products out there that can be oil free and moisturizing without causing me to breakout.......so I thought.
Urban Decay has once again blown my mind. Now I know it's on the pricey side (perks of a makeup artist/hairstylist) but its well worth the $34 for this Beauty Balm. They chose wisely to include it as part of their Naked line. I picked it up at Ulta and got a free gift of their 24/7 glide on black liner and their newer makeup setting spray which works pretty well too. So here's the scoop in why I love Urban's BB Creme the most.
*It only has SPF 20 which is actually healthier for you because of what needs to be in SPF to make it stronger is actually toxic to your body. So it does help provide a healthy level of protection.
* Its oil free but hydrates and helps improve proper hydration over time
* It primes so your makeup stays where it belongs and doesn't clog pores.
* It has a general pigment that will fade into any skin tone without dulling your skin so it can minimize pores, lines, wrinkles and redness
* It actually treats your skin to improve elasticity, firming and reducing spots as well!
If you are really dry naturally I would follow with your regular moisturizer. It's Demi-matte so no matte tour skin type it won't be oily. The consistency is also very liquid to Creme. Most primers are very creamy to help minimize pores and wrinkles but that doesn't work well if you are acne prone. Give it a try!
Monday, April 15, 2013
Prayers
We all have our hurdles, our breaks, our limits. Our compassion from common struggle is what continues to keep us united. Life taken soon is never fair to the rest of us who are left. we are left with uncertainty, the ultimate pain, and fear. whether its at a school, in a two tall business buildings, an airplane, a theatre, on a war front, at a marathon, in our homes, our jobs, our finances, or our hearts and minds. Strength in numbers. Prayer is the oldest invention.
Tuesday, April 9, 2013
Donzo!
Okay kiddos, so it was a lot of work with this ole back but with my hubby's help and my trusty tens unit, my rehabbed broyhill is up! Sneak peek pic of some more DIY accent pieces to hang over the headboard. Using some awesome monogram letters I found at anthropologie for our wedding that i didnt end up using and some vintage old school shutters! ( yes there will be more steel wool involved)... To be continued! Stay posted dandies!!
Monday, April 1, 2013
Natural backyard nuptials
I had the pleasure of dolling up Jaimie for her bridal trial. Every once and a while a makeup artist gets lucky and has a bride who already has perfect skin. She's having an elegant but low key wedding in her own backyard! More to come, her main colors are lavender and grey and teal so her look was created with Aveda's twilight eyeshadow trio, a natural strip lash to add morr dramatic effect without having to put too much shadow on her since she notmally doesnt wear much makeup. bronzer and juniper lip glaze. I finished her with Nyx hd translucent powder to reduce shine in photos. Stay tune for her nuptials!! If you ever want a makeup lesson or need any hair and makeup services check me/us out at Earth Salon and Spa. Aveda is an amazing plant based company that works towards the greater global good and amazing paraben free hair color and products!
Visit earthsalonspa.com
Wednesday, March 27, 2013
Subtle smokey eye
So a lot of people always want to know how to do a smokey eye. No matter the tutorial everyone's eye shape is different. I'm posting one for a general eye shape as it works for a broad spectrum of shapes. My eyes are personally on the almond side and are small.....so I have a medium sized palette to work with. But this will work for small eyes, hooded eyes, big eyes, you name it.
First make sure you don't have plastic brushes, having good fluffy brushes is the key to blending anything that comes out looking harsh. If you don't have good brushes....use your god given ones....your cute little fingers!! The photo below shows the my brushes in the order I use them from left to right, ending with my winged liner then mascara.
I also use Urban Decays Naked Palettes ALOT!!! These are colors I used from Naked Palette 1
1) Use the darker color shadow on the outer part of your lid and work inward, don't go too far up into the crease, it'll turn it into a more dramatic smokey eye if you do and that's where challenges and raccoon eyes are born for newbies. I used UD's Darkhorse
2) Next use your medium color shadow to blend the middle of your lid and work your way to the inner part of your lid until where your iris ends. I used UD's Buck
3) Then take your lightest color and work on your inner lid to the inner corner of your eye. I used UD's Naked.
4) Take a small smudger brush and use the same original dark shadow color and line your lower lash line. This will help keep a nice and natural flow to the smokey effect without the hard edges.
5) Last, Take your original big fluff brush (or finger) and blend all the colors across into your crease, working your way inwards from your outer eye.
A lot of people always complement my winged liner as well. I prefer Stila's waterproof eyeliner pen.
6) Get as close to your lashes as possible, don't worry, with a pen you can go back and fill in the funny spaces. Then imagine a line from your lower lash line that goes up, use this as a guide the draw your wing. This will give you that upward winged look and it creates a look of long dramatic lashes.
Voila!!!! Try not to kiss yourself,
First make sure you don't have plastic brushes, having good fluffy brushes is the key to blending anything that comes out looking harsh. If you don't have good brushes....use your god given ones....your cute little fingers!! The photo below shows the my brushes in the order I use them from left to right, ending with my winged liner then mascara.
I also use Urban Decays Naked Palettes ALOT!!! These are colors I used from Naked Palette 1
1) Use the darker color shadow on the outer part of your lid and work inward, don't go too far up into the crease, it'll turn it into a more dramatic smokey eye if you do and that's where challenges and raccoon eyes are born for newbies. I used UD's Darkhorse
2) Next use your medium color shadow to blend the middle of your lid and work your way to the inner part of your lid until where your iris ends. I used UD's Buck
3) Then take your lightest color and work on your inner lid to the inner corner of your eye. I used UD's Naked.
4) Take a small smudger brush and use the same original dark shadow color and line your lower lash line. This will help keep a nice and natural flow to the smokey effect without the hard edges.
5) Last, Take your original big fluff brush (or finger) and blend all the colors across into your crease, working your way inwards from your outer eye.
A lot of people always complement my winged liner as well. I prefer Stila's waterproof eyeliner pen.
6) Get as close to your lashes as possible, don't worry, with a pen you can go back and fill in the funny spaces. Then imagine a line from your lower lash line that goes up, use this as a guide the draw your wing. This will give you that upward winged look and it creates a look of long dramatic lashes.
Voila!!!! Try not to kiss yourself,
Sunday, March 24, 2013
DIY organic body butter
So I was short on the bucks this holiday season and made a slew or organic beautifying products to save on cash and learn a few things. Here's what you'll need
Jar (I used mason jars)
3/4 cup of coconut oil
2 drops of Lavander essential oil (make sure you purchase yours at a health food store to ensure against topical irritation. Some "essential oils" are actually just fragrance)
1/2 cup of Coconut butter or Shea butter
1/4 cup almond oil
Whisk
Place the coconut oil, butter and oil into a bowl and whip together. It will be more of a liquidy form. Place in refrigerator for 5 minutes. Remove from fridge and whip again this time add 2 drops of lavender oil. Place in refrigerator again. Remove and whip. Repeat this step a total of four or five times. The final time you remove from the refrigerator and whip it will be ready to pour into jar. Mason jars work the best because they are intended for preserving. Store your body butter in a cool and dry place so the oils don't separate. Coconut is an excellent source of vitamins and is excellent for softening skin, dulling scars and stretch marks and is even amazing for your hair!! It reduces frizz and adds essential proteins to the hair. Enjoy your yummy body butter. Stay tuned for my Raw sugar coconut scrub!!
Jar (I used mason jars)
3/4 cup of coconut oil
2 drops of Lavander essential oil (make sure you purchase yours at a health food store to ensure against topical irritation. Some "essential oils" are actually just fragrance)
1/2 cup of Coconut butter or Shea butter
1/4 cup almond oil
Whisk
Place the coconut oil, butter and oil into a bowl and whip together. It will be more of a liquidy form. Place in refrigerator for 5 minutes. Remove from fridge and whip again this time add 2 drops of lavender oil. Place in refrigerator again. Remove and whip. Repeat this step a total of four or five times. The final time you remove from the refrigerator and whip it will be ready to pour into jar. Mason jars work the best because they are intended for preserving. Store your body butter in a cool and dry place so the oils don't separate. Coconut is an excellent source of vitamins and is excellent for softening skin, dulling scars and stretch marks and is even amazing for your hair!! It reduces frizz and adds essential proteins to the hair. Enjoy your yummy body butter. Stay tuned for my Raw sugar coconut scrub!!
Thursday, March 21, 2013
The Weekly Wednesday Wants
Labels:
boots,
fashion,
glitter nails,
jean jacket,
Linda Farrow Luxe,
mint,
Miss Selfridge,
naked palette,
natural makeup,
Nine West,
peach,
polyvore,
River Island,
Stila,
style,
the dandy fox,
Topshop,
urban decay,
VILA
Subscribe to:
Posts (Atom)