Showing posts with label crafts. Show all posts

Saturday, June 29, 2013

Blog break breakdown and a Fire pit facelift

Hey dandies it has been quite the while! i physically havent been doigg so well and physically signed the consent forms for back surgery where they will decompress and fuse me lowest two vertabrae. So I've been I'm so much pain that even writing wasn't sounding great to me. But the point of this blog is to take my mind off of how much it hurts and it'll be over soon. I've even had little angels of encouragement randomly along the way to set my heart and mind at ease.
I had a major procedure called a Discogram followed by a ct scan who h showed my back to be much worse so its time. The consequences of going without doesn't leave much of a future for activities or being a mommy one day without it so cut me up doc! Haha my doctor is the sweetest guy and a very brilliant man and comes with a long list of accomplishments over the last 35 years he's been a spine specialist/surgeon so I'm in good hands. On to happy and better things!! My husbands niece Kim came in from New York with her boyfriend and they are spending the week with us. It was one of the things that fueled our patio fix including a lot of beautiful flowers, patio set. An antique ladder as a planter, string lights, and its coming along just lovely. The yard isn't quite complete but stil, we have a bit to get there! 
 So when we moved into our beach bungalow we were left with a disgusting yard which should have been handles by our landlord who is quite a bit of a persnickety lady (think weeds up toyour knees  cobwebbed moldy hibiscus and a moldy banana tree all bug infested) and a very sad little fire pit. Seriously it looked like a zombie fire pit, as you shall see,It was completely charred and rusted over but what remained looked to be like one they have at Walmart. Our hope is to finish an outdoor bar and built a stone fire pit but with me stopping work soon, disability won't pay for that just yet. Gotta make sure we have a little nest for a bad month. So here was the progress! You can do this with your old BBQ too if you'd rather spend your $ on party stuff or food or yard decor.
*First you'll need Rustoleum's high head flat of semigloss restorative spray enamel. This puppy makes pretty and stands up to 1200 degrees of built up heat!

* then pull apart your fire pit or BBQ if you can and hose it down with good water pressure on your hose nozzle or bust out the old summer spritz with a finger partially over the hose head, and get that puppy well rinsed.
 Then use a metal grill brush to scrape off any excess "funk" that may be plaguing your pit. 

*Once it's dry you can paint! Shake the can well and keep it a good 6 inches from the surface. Try to spray in the same direction. I had to sit for this part so it took me a while but let that dry for 20 mins and spray one more coat, make sure you always keep the can moving to prevent streaks, blotches or paint running. Let dry. Then set it back together. Now it's voila and ready for logs and marshmallows!!! The can can be bought at The Home Depot for around $3/$4. Not bad for the zombie fire pit! 


Tuesday, June 18, 2013

Trash to treasure Tuesdays and this little life.

So even though I'm not updating the blog as often with craftiness and blurbs. This pot is stirring. Im not sure if its me stirring it, my husband, the good lord, my family, my work, or all of us.....but its a brewin! 
      My husband's niece (mine too by marriage!) is coming to visit next week all the way from New York,  so we are prepping the place for her arrival and I have a million tests and doctors appointments to be had as well at the same time. in fact ill be in a ct scanning machine when her plane lands! but we are hoping that the weather here is beautiful and that she can just relax and enjoy herselfI will give a full blog post on before and afters of the patio. Some trash we've found, some diy, some rehabbing, and yes some Wal Mart (which feels like splurging when your on limited income)  even.  Hey I'm on a budget but here is another amazing photo of something that is going to serve as a flower and herb stand in our patio to free up some room for firing up the BBQ. It will be a nice retreat for me to recover from my upcoming surgery (almost there finally!!!!) as well.
    Things are looking up. I didn't know it was possible. But it's hard to notice that things are looking up when your head is always down.  There was barely little rays of hope. Ive personally experienced losing our home in 2007. a wildfire ate every shred of memory i had ever made where i grew up. and i thought that was bad. cake compared to the fire of pain that burns you from the inside out. 
Alls we had a few weeks ago was prayers from friends and family. Extra Groceries being delivered, cans of beans, coupons, collection calls,  i had to cut work which was very difficult financially in the midst of it and mentally to relinquish control of stability, we were literally having friends give us toilet paper and now things are falling slowly into place. We are still not out of this riptide but we aren't drowning at the moment...and breathing without fear is a lot nicer than gasping for air in between the blows. 
With a lot of family and friends' prayers and just trying to envision what I want from life and my recovery and putting anger aside as this physical "speed bump" has forced me to have more faith and say thanks for anything instead of poor me why me what did I do? It's tested my marriage for the better (even if it didn't feel like it) and its giving me a break. I've burned out in the whitewash for so long and now Im Floating past the break and things are calming........even if its cloudy and cold. I don't know a lot of relationships or marriages that would survive this. Almost everyone we know lives on credit, parents helping (even if they live with them) or watching people travel and have children.....all while my husband has to pull the weight of us both and can only comfort me with words. Even hugs are excruciating. I've  met people along the way whose relationships didn't work out because a physical disability. It is something that affects everyone around you when it becomes too much. Only a few of us are lucky enough who have family and partners nutty enough to stick around. We expect in sickness and in health much later in life and when it's mixed I with for richer or poorer when you are supposed to be in your physical prime is very mentally challenging for couples. Especially if you want to travel, make plans and be parents one day. It's hard to  think you may not have that. But you have each other and I keep getting surrounded by people who have so many great strengths, whether its words of encouragement, handing me chocolate when I'm crying, or watching someone else whose physically hurting laughing  It inspires me to tears. So now I have new goals to set. Inspirations are going to be my aspirations. 

Saturday, June 1, 2013

Beat the heat with water sweets!

 Okay so maybe you are having a small get together, friends over, shower, or maybe you are just sitting alone and soaking up the sun on your patio or couch! It's a great way to make your water taste amazing!
 (who needs Mio? That stuff freaks me out! It's like hair dye for water. Yikes!)
This can be made in a single serving as I did, or in a pitcher or drink server. I prefer glass servers because drinks stay colder longer!
* First fill your beverage server with about just over half full (to prevent overflowin!) with cold fresh water. 

* Next, select your fruit of choice. For mine I picked strawberries and green grapes. Slice your fruit small enough to fit well in ratio to the size of your serving container. If you are trying larger, circular fruits (or veggies) slice them garnish style to keep the circular shape and then cut that in half to bring out its juices and flavor!
 
* Third step, pop those fruity tootys in and add just a pinch a raw sugar, stevia and cane sugar work well too. 
 Some fruit is less dense so it will float to the top, so grab a muddle or spoon and muddle the fruit slightly to release its flavor into the water. Three or four muddles tops, you want your fruit to be somewhat intact otherwise it's just asking for someone to choke! Then let the fruit sit and relax for a bit.


*Alright! Smells good right?! So now give it a swirl, and add ice, just enough to keep it cool. Pop a little garnish on it or even sugar the  and a straw and you are ready to sip on a delicious twist on good old water! Now grab your cutest hat with some sunscreen and so sip in sweet summer style!


This easy mock tail recipe works great for non colored sodas, sparkling water and alcohol or champagne as well. I have also done this with Hansens cherry vanilla Creme, a shot of blueberry Stolichnaya vodka or if using regular vodka just a dash of Triple Sec and it is absolutely delicious. This recipe is just a great way to kill the sweet tooth and get hydrated with something healthy like fruits!  Enjoy!   

Friday, May 10, 2013

Friday Facelift!

Not feeling my best today but found something ugly on my media cabinet and grabbed some silver from my graffiti cabinet and made something prettier. New paint brush holder. Who knew! Take something weird or old in your house and give it a face lift. Great way to add new pops to your place when you can't afford to go out and buy something to make it pop! Have a dandy weekend kids!


Wednesday, May 8, 2013

Personalize the impersonal.

Okay so today I'm blogging on how to make my personally favorite present, a gift card...... personal!
A lot of people seem to think that they are impersonal, but since I'm not rolling in cash I can't just shop whenever I'd like. Getting a gift card gives me an experience that I can't often afford myself, I'm a crafter and sale finder. I find a lot of random designer stuff on sale because I just refuse to pay full price for most things. So gift cards are as good as gold to me. While they come on a cardboard thingy and there are actual gift card boxes you can use....making the packaging is alot more special.
This tutorial is actually a gift for my moms Mother's Day present. I hope she doesn't read this before she opens it!
First you are going to need your supplies to get started. Any smaller envelope will do, I actually reused the leftover RSVP envelopes we had from our wedding.
SUPPLY LIST
Envelope
Craft paper
Die cutters
Jute twine or bakers twine
Beads and fish wire (optional for added decor)
Ink pad

* First, you are going to want to select which craft paper to use. I used two different ones to create contrast of the two shapes.
* I took my assorted markers and made little polka dots on the envelope face that matches the colors of the craft paper chosen.
* I then used the die cutters to easy cut the shapes that I wanted for the envelope cover.
* Apply glue generously to larger cutout and place where you'd like on the envelope face. Let dry for a few seconds, then apply the second, smaller cutout if you wish. Let dry.
* Use your gift card to crest a template for craft paper that will match the die cuts on the front. Make sure it's larger than the gift card, but small enough to insert smoothly into your envelope. Now lick n seal it!

* Now that your at the back of the envelope anyways, it's time to make a fingerprint heart! Pick your favorite finger (I picked my thumb because it is the strongest and most useful, just like my mommy). For me, this personalized my crafting the most, after all my fingerprints only exist because of my parents.
* First press your thumb into the ink pad and use some test paper first to see how much control you have of your print transfer. Now do the same on the sealed part of your envelope, once pointing your finger left, then re ink your finger and repeat by slightly over lapping the previous print with this time your finger pointed to the right. Now you have a heart shape with your finger.

* Now cut your choice of wire or twine. I cut mine about a foot and a half in length to give myself room for error. This method works for ribbon wrapping for presents as well.

* Lay your twine vertically and place your envelope face down on top of it with your twine underneath in the middle. Bring each side of your twine across the envelope and when they meet in the middle, change direction and cross the twine over and being to pull horizontally. This will give you that crossed look in the back.

* While holding the twine in place, flip the envelope face up. Tie a knot to secure , not too tight cause you will start to rip and pull the edges of your envelope. Now you can insert any charms or bears that you want to add and tie that fish wire at an area of twine close to the base of your knot.

*Now finish it off my tying a bow. Trim any excess left of twine.
* Your done! Now you have an amazing personalized gift card.


Monday, May 6, 2013

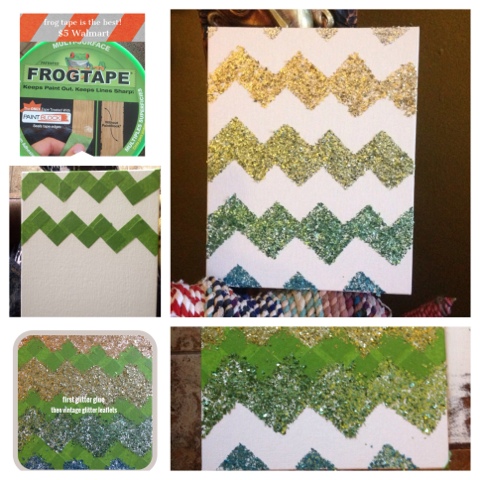
Ombré glitter chevron print on canvas

Happy Monday readers!! It's chilly here in oceanside and I had some downtime (as one does with a bad back often) this weekend to get into the craft box since my hubby worked on his "man space" in the garage.
A lot of the items i used to craft is all repurposed from my wedding so I was really surprised to find that I still had alot of stuff. Even though the wedding was only a year and a half ago.
So if you like this dandy little craft here's the easy how to. ( Side note: This is also how I'm working on repurposing a dresser since I'd rather make my own Chevron print stencil a la Frog tape than pay for a stencil. It's pretty easy on bugger surfaces with a tape measure of ruler. )

Here are the items you'll need
* CANVAS (I have alot of 5x7 & 8x11 from micheals cause they are cheap)
* FROG TAPE (yes the paint block technology is an actual thing that works. I joked till I found its true)
* SCISSORS
* GLITTER GLUE (mod podge, gel medium, acrylic paint works too)
* KESHA, OH I MEAN GLITTER (I have a pack of vintage leaflet glitter from Martha Stewarts line which comes in a ton of great colors and mix well, but you can use whatever you have)
*PAINT BRUSH OR SPONGE BRUSH APPLICATOR (to pack the glitter once applied so you don't end up like Kesha)
*PATIENCE

Remember you can also do this with watercolor or acrylic paint for a more contemporary style.

First you are going to want to mark off your chevron print. I found that 2 inch
strips of frog tape worked well.
Start from left to right and work the next strip of tape overlapping the previous slightly (make sure they are lined up good so you get even lines). Keep each chevron line about an inch apart.
Make sure you go over the tape with your fingers so it is nice and flat and secures well to the canvas. It's okay if you have seams from tape strips overlapping, that won't matter.
Once you have all your frog tape in place, generously apply your form of glue or paint in the open or blank areas. Go section by section so you don't get dried out.
Sprinkle your glitter generously all over the glued areas. I used a brush/sponge to help spread and pack the glitter in there so I had no "naked" spots.
Work your way down section by section until your canvas is completely glittered or painted.
Now be a patient little fox and let this pretty dry. I left for work and came home later so this had around 4 hours to dry. It probably only needs 1 or 2 hours max to dry.
If you used glitter, shake any excess glitter off of your canvas.
Now it's time to peel!!
Start peeling the frog tape from left to right, as this is how you would have applied the frog tape originally. Go slowly, so not to stress the glittered or painted areas. This part is actually kind of fun, you'll see how well frog tape does block out everything!
Once all the tape is removed, give it a little shake and tap the edges to let any more excess fall off.
That's it! Now don't go crazy and chevron your entire house like I have!